Annotations have been a part of Java programming language since JDK version 1.5. Since then, they have constantly gained on popularity and nowadays you probably couldn’t find a class that doesn’t use at least one annotation in its code. There is also a support library available, providing several useful annotations to be used in Android development. In this post, which is the first post of the Android Annotations series, we’ll have a look at what the annotations from Android Support library have to offer.
For those who haven’t worked with annotations before or are not sure if they understand them properly, an annotation is a sort of metadata that can be added to the Java source code. You can annotate classes, methods, variables, parameters, and even whole packages in Java. An example of a commonly used annotation in almost every Java class is the @Override annotation which check that the annotated method is an override of the parent class method.
Android Annotations support library
The Android Support library in version 19.1 first came with a new annotation package. Its purpose is to provide you, as a developer, with annotations to help you avoid potential bugs in your code. The Android framework internally uses these annotations and surely you’ll benefit from adding them to your code as well.
Even though the Annotations Support library is distributed as a stand-alone dependency, it’s already installed if you use the AppCompat Support library. If not, just add this line to your build.gradle file:
dependencies {
    compile 'com.android.support:support-annotations:24.1.1'
}
Android Studio supports annotations by default and checks your code for errors during run-time. Automatic Lint checking is also available by executing menu item Analyze -> Inspect code. It displays conflict messages throughout the code to indicate annotation conflicts and suggests possible resolutions.
Let’s have a more detailed look at what types of Android annotations the support library provides and how can it help you in writing a better code.
Nullness Annotations
Android Annotations provide two annotations @Nullable and @NonNull to check the nullness of a variable, parameter, or return value.
Example usage can be seen in getName method which takes a @Nullable first name and @NonNull last name parameters. Also the return value cannot be Null as annotated:
@NonNull
public String getName(@Nullable String firstName, @NonNull String lastName) {
    return firstName == null ? lastName : firstName + " " + lastName;
}
If you then try to pass last name parameter which is Null, Android Studio will warn you that you have a potential error in your application’s code.

Android Studio also supports automatic nullability analysis to infer nullness annotations in your code. To run the analysis, select Analyze -> Infer Nullity. After that, it’s always good to manually check for possible mistakes though.
Resource Type Annotations
Android resources are typically passed as integers in the code. Therefore, some sort of validation of resource type (String resource, Drawable resource, Color resource, etc.) might be useful. Android Annotations Support library provides several annotations for validating the resource type so that you can avoid these hard-to-debug errors.
There is an annotation for each type of resource: @StringRes, @DrawableRes, @DimenRes, @ColorRes, @InterpolatorRes, etc. Additionally, there is @AnyRes annotation provided, which is a special kind allowing to pass any type of resource. Of course you can also annotate a parameter with more than one resource type annotations.
Then, if you mistakenly pass a wrong type of resource in your code, your IDE will produce a warning. Example usage of the resource validation follows. In this case, if you try to pass the parameter as a resource of different type than R.string, a warning will be raised.
public void setText(@StringRes int nameRes) {
    name.setText(nameRes);
}
Typedef Annotations
Android Annotations Support library allows you to define custom types of integer and string constants. The @IntDef annotation lets you crate a typedef representing the valid integer constants. This is similar to enumerations. Let’s use the example from my previous post on reducing the APK size to demonstrate how to substitute enumeration in your code in order to save memory and storage by using typedef annotations.
@IntDef({Status.IDLE, Status.RUNNING, Status.FINISHED})
@Retention(RetentionPolicy.SOURCE)
@interface Status {
	int IDLE = 0;
	int RUNNING = 1;
	int FINISHED = 2;
}
Similarly to @IntDef, there is a @StringDef annotation provided, allowing to define set of string constants.
Threading Annotations
Since Support library version 22.2 and later, threading Android annotations are provided. They are used to restrict the type of thread from which a given method should be called. If all methods in a class share the same threading requirements, you can annotate the whole class.
The four threading annotations are: @UiThread, @MainThread, @WorkerThread, and @BinderThread. Their meaning is quite straight-forward with @UiThread and @MainThread being practically interchangeable.
If you attempt to call your annotated method from a different type of thread than specified, you get a similar warning in your IDE to this:

Value Constraints Annotations
In case you need to validate the values of your method parameters, the Android Annotations Support library comes handy with three annotations for this purpose: @IntRange, @FloatRange, and @Size.
If your parameter is of an int or long type, and you need to constrain the value of it, use @IntRange annotation. This is mostly useful in cases the users are likely to mistakenly input a different range for the parameter. For example the alpha value could be represented by float from 0 to 1 or by integer from 0 to 255.
public void setAlpha(@IntRange(from=0, to=255) int alpha);
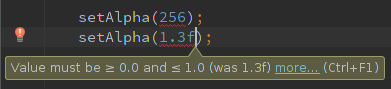
Similarly, for float and double parameters you can use @FloatRange.
public void setAlpha(@FloatRange(from=0.0, to=1.0) float alpha);
The last annotation @Size is to be used with arrays, collections and Strings to specify constraints on their size. There are several attributes for the @Size annotation that you can use: e.g. min, max, multiple.
For example to specify a collection that mustn’t be empty, you’d write @Size(min=1); a String of maximum length of 10 characters @Size(max=10); an array of exact size of 5 elements @Size(5); or if you require the size to be an even number, use @Size(multiple=2).
Permissions Annotations
To check that a correct permissions are set, annotate a method with the @RequiresPermission annotation. That way you can make sure that the required permission is set in the manifest file and your code will work correctly.
@RequiresPermission(Manifest.permission.SET_WALLPAPER)
public void setWallpaper(Bitmap bitmap);

If there are more than one permission, use either anyOf attribute to check for a single permission from a list, or allOf attribute to check for a whole set of permissions.
@RequiresPermission(allOf = {
    Manifest.permission.READ_EXTERNAL_STORAGE,
    Manifest.permission.WRITE_EXTERNAL_STORAGE})
public static final void copyFile(String dest, String source);
Conclusion
In this post, Android Annotations from the Android Support library have been introduced. Several most-used annotations have been described in detail together with example usages of how you can improve your code when using them. For a full list of all supported Android Annotations, please go to the Android Support annotations package summary page.
In the following post of the Android annotations series, we’ll have a look at AndroidAnnotations library which could save you, as a developer, a lot of precious time as well as boilerplate code when developing for Android by using annotations for repeated tasks in code and generating the boilerplate code for you.
Sources
- Android Studio Project Site: Support Annotations
- Android Studio: Improve Code Inspection with Annotations